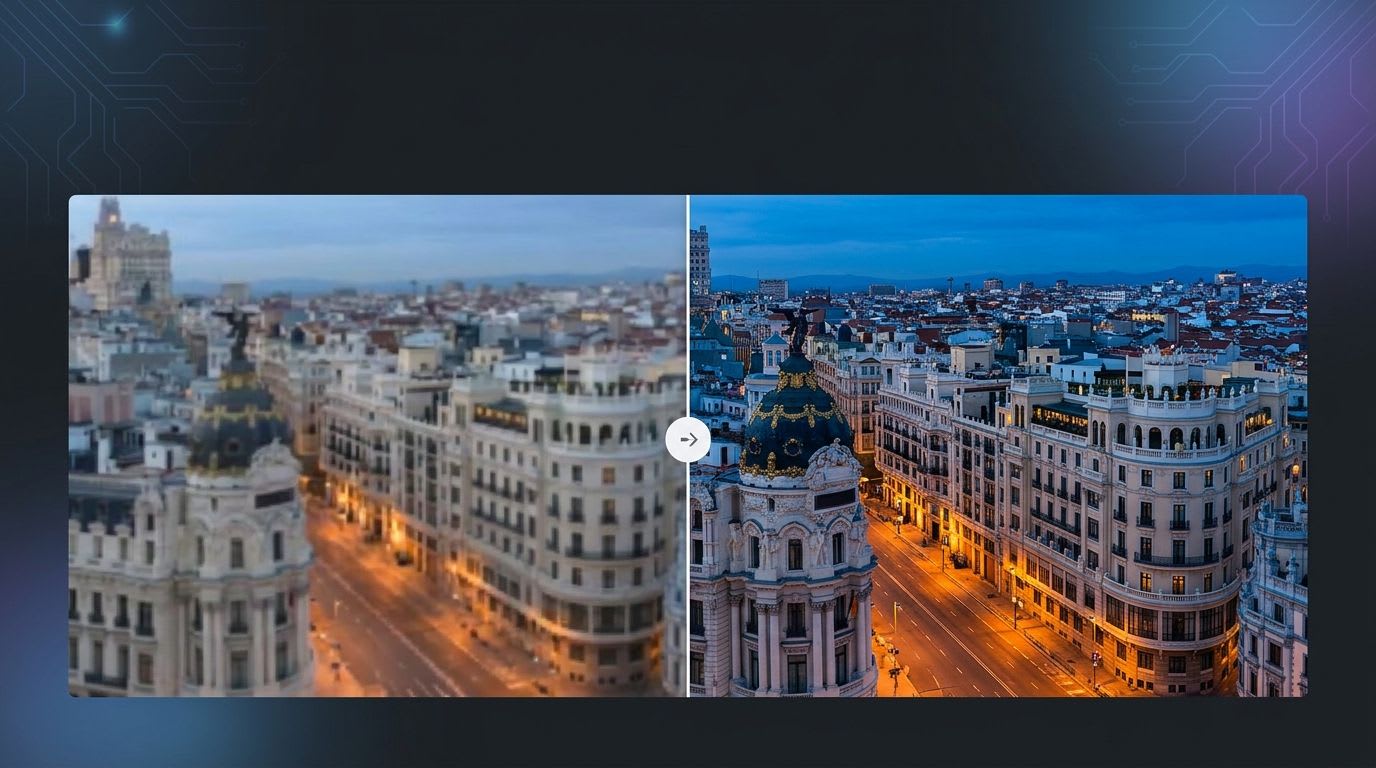
Upscale videos with Video2X — completely free, using nothing but a browser tab and Google Colab. Open the notebook, run the cells in order, and a blurry, low-resolution clip comes out the other side looking sharp and detailed. No GPU purchase, no software install, no coding required.
There used to be a real cost to fixing an old, blurry video — either an expensive desktop GPU or a paid upscaling tool. Video2X, running on Colab's free cloud GPUs, gets you most of the way there for $0. This guide walks through the notebook cell by cell, covers the two AI engines it uses, and fixes the errors people actually run into.
What is Video2X on Colab? Video2X is an open-source AI video upscaler. Running it through Google Colab means you're using Google's cloud GPUs instead of your own hardware, so you can upscale footage to 1080p or 4K with models like Real-ESRGAN — for free, with nothing installed locally.
Is Video2X free?
Yes. Colab hands you a free GPU environment, and Video2X itself is open-source, so the entire workflow costs nothing. The only limits are Colab's session caps (more on that below), not the software.
Step 1 — Open the Video2X Colab Notebook
Everything's pre-built. Open the notebook in your browser:
[Open the Video2X Colab Notebook →]
Inside, you'll find four cells. Run them top to bottom, in order — don't skip ahead.
Step 2 — Run the Environment Setup Cell
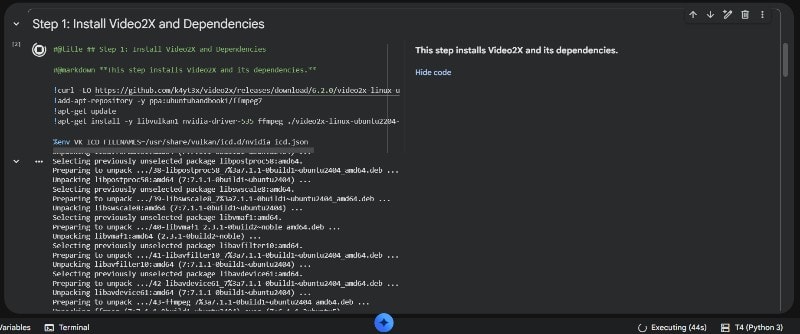
The first cell builds the environment: it installs ffmpeg, pulls in the Python dependencies Video2X needs, and checks what GPU Colab has handed you.
Press the run icon and wait. Nothing to type, nothing to configure.
Time required: about 1 minute.
What it's doing behind the scenes:
Installing ffmpeg for video handling
Loading the Python packages the AI model depends on
Confirming your Colab GPU is available and ready
You'll see lines like Setting up... or Done installing scroll past. Once that stops, move to the next cell.
Step 3 — Download the AI Models (Real-ESRGAN)
This is the cell that actually gives Video2X its "brain." It clones the official Video2X repository and downloads the pre-trained model weights — Real-ESRGAN being the main one doing the heavy lifting for live-action footage.
Time required: around 5 minutes.
What happens:
Clones the official Video2X repo
Downloads the trained model weights automatically
Organizes everything for Colab's runtime
You don't configure the model yourself — it's fetched and set up automatically. When you see "Download complete" (or the run icon stops spinning), you're clear to continue.
Real-ESRGAN vs. Waifu2x — which engine should you use? Video2X isn't limited to one model. Real-ESRGAN is the better pick for live-action video and real-world footage — it's trained to reconstruct realistic detail and texture. If you're upscaling anime or 2D animation instead, Waifu2x (or Anime4K) tends to produce cleaner line art and flatter color reconstruction, since it's trained on that kind of source material specifically. For most people upscaling home videos, old camcorder footage, or downloaded clips, Real-ESRGAN is the default and the one this guide uses.
Step 4 — Mount Your Google Drive
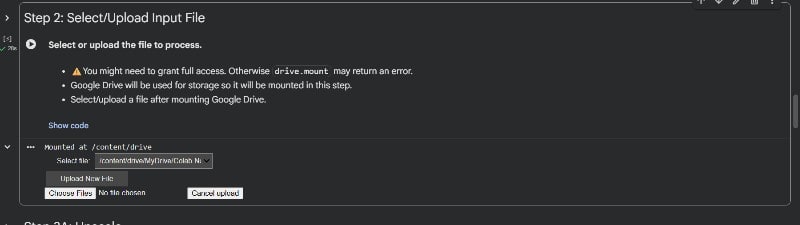
The third cell connects your Google Drive to the notebook. Click the link it gives you, allow access, and paste the authorization code back into Colab.

After mounting:
Time required: 1–2 minutes.
Why this matters:
Your input video needs to live somewhere Colab can read it — that's Drive
The finished, upscaled video gets saved back to Drive too
This is what protects your output if the Colab session disconnects mid-run
Once mounted, your Drive shows up at /content/drive/. Drop your source video somewhere like /MyDrive/Video2X/input/ and you're ready for the next step. You'll also get the option to pull a video from your local machine instead of Drive — just know the output always lands back in Drive regardless of where the input came from.
Step 5 — Run the AI Enhancement Cell
This is where Video2X does the actual work: extracting every frame of your video, running each one through the upscaling model, and reassembling the result.
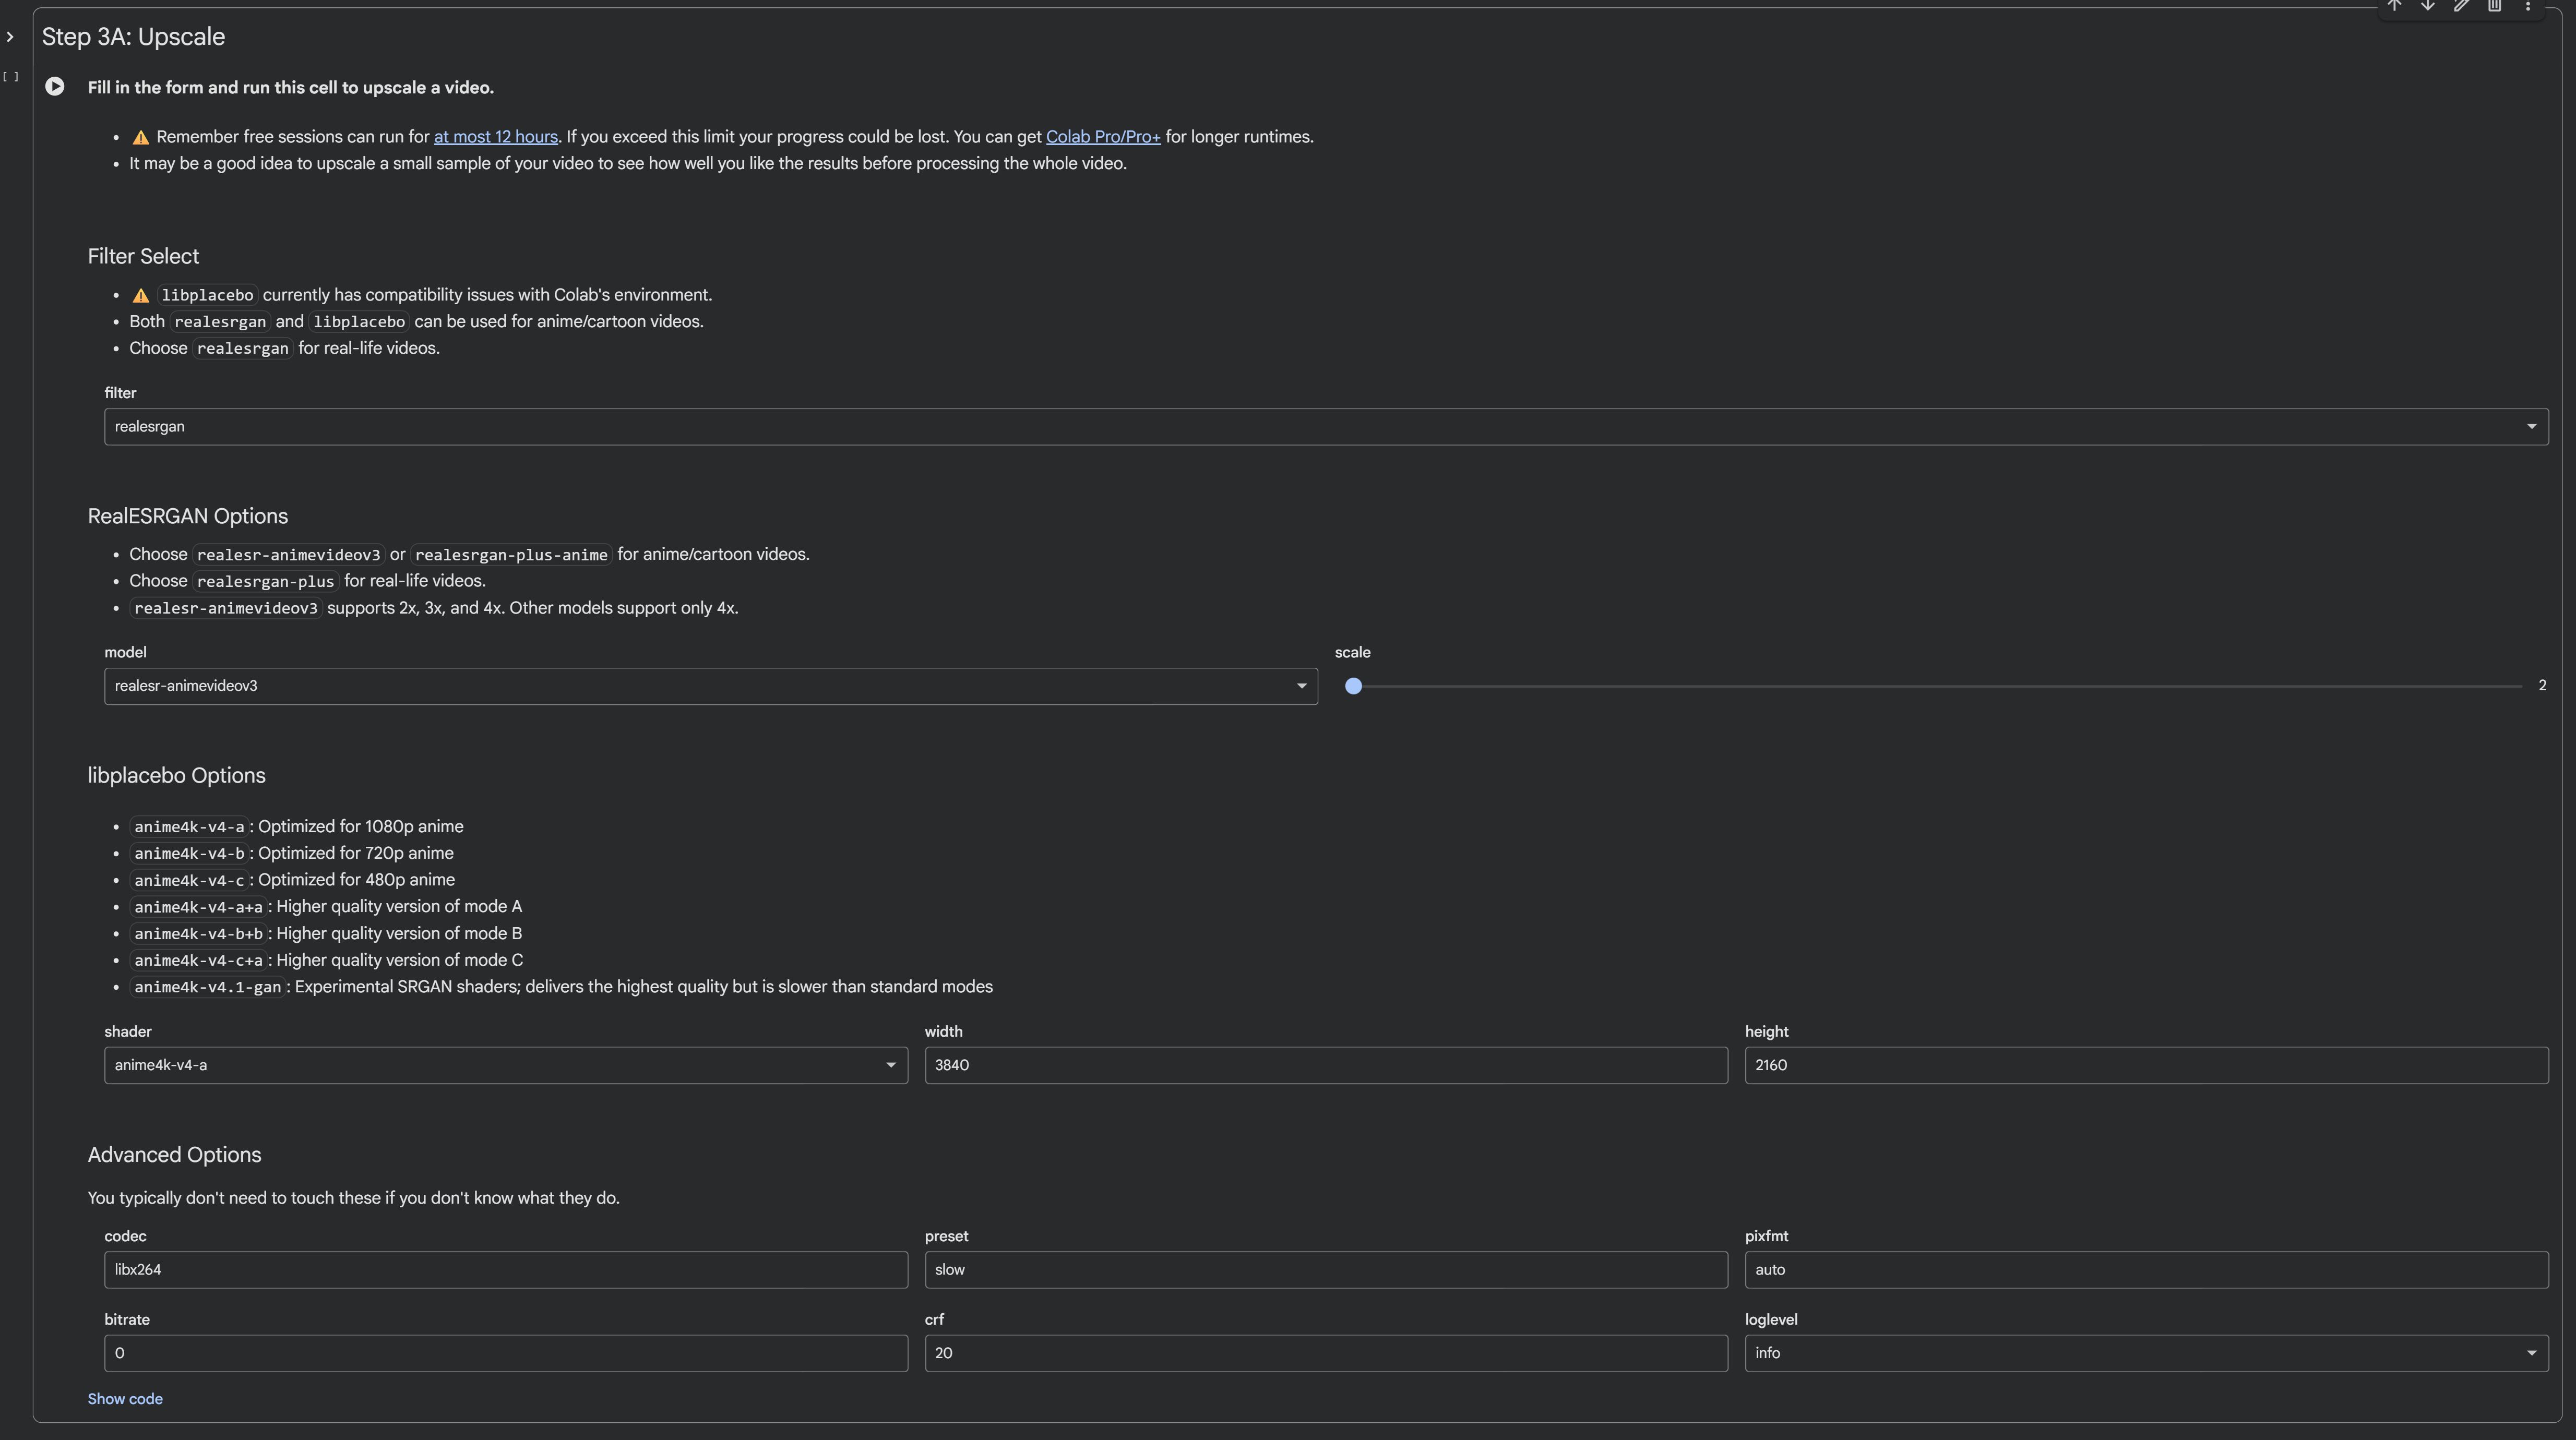
Time required depends entirely on your clip:
Under 30 seconds: 2–3 minutes
720p clip: ~10 minutes
1080p or 4K, longer clips: 30–60+ minutes
What's happening under the hood:
Every frame is extracted from the source video
The AI model enhances each frame, pixel by pixel
The frames are stitched back into a finished video and saved to Drive
When it's done, find your output at /MyDrive/Video2X/outputs/.
Note:
This cell isn't just a "press run and wait" step — it's actually a configuration form, and picking the right settings here matters more than most guides let on.
Filter Select
At the top you'll choose between two engines: realesrgan and libplacebo. Both can technically handle anime/cartoon content, but as of this writing libplacebo has some compatibility issues on Colab's environment, so unless you specifically need it, stick with realesrgan — especially for real-life footage, where it's the recommended choice anyway.
RealESRGAN Options
Once you've selected realesrgan, a model dropdown and a scale slider appear:
realesr-animevideov3orrealesrgan-plus-anime— best for anime/cartoon videorealesrgan-plus— best for real-life footageScale:
realesr-animevideov3supports 2×, 3×, and 4×. The other models are locked to 4× only.
For most real-world footage, realesrgan-plus at a 2× scale is the safer starting point — it's noticeably faster than 4×, and for a lot of source material the quality gain from 4× isn't worth the extra render time.
libplacebo Options (if you select that filter instead)
This swaps you into shader-based upscaling with presets tuned to specific resolutions:
anime4k-v4-a— optimized for 1080p animeanime4k-v4-b— optimized for 720p animeanime4k-v4-c— optimized for 480p animeanime4k-v4-a+a,anime4k-v4-b+b,anime4k-v4-c+a— higher-quality versions of the modes aboveanime4k-v4.1-gan— an experimental SRGAN shader; best quality on offer, but slower than the standard modes
You'll also set a target width and height directly (e.g. 3840×2160 for 4K) rather than a scale multiplier.
Advanced Options
Below that sits a section most people skip entirely — and honestly, you usually can. It controls the actual video encode: codec (defaults to libx264), preset (slow gives better compression at the cost of encode time), pixfmt, bitrate, crf (lower means higher quality and larger file size — 20 is a solid default), and loglevel. Leave these as-is unless you specifically know you need a different codec or are chasing a smaller file size.
One thing worth flagging before you hit run: Colab's free tier caps sessions at 12 hours, and if you go over that, you lose your progress. If you're processing something long, it's worth upscaling a short sample clip first with these same settings just to confirm you're happy with the output before committing a full render to it.
What the Result Actually Looks Like
The upscaled output is noticeably sharper and cleaner than the source — most people use this for:
Restoring old or low-quality footage
Sharpening YouTube uploads, reels, and shorts before posting
Improving clarity on old animation or camcorder clips for editing projects
It's running on a free Colab GPU, so it's not going to match a dedicated workstation — but it gets close enough that most casual and semi-pro use cases don't need anything more.
Video2X on Colab vs. Topaz Video AI
If you've looked into video upscaling before, you've probably run into Topaz Video AI — the paid desktop standard, priced around $299, and it needs a genuinely capable local GPU to run at a reasonable speed. Video2X on Colab skips both of those requirements. You're trading a bit of quality ceiling and some processing speed for a $0 price tag and zero hardware requirements — for most everyday footage, the gap in final output quality is smaller than the gap in cost.
Colab Limits You Should Know About
Colab's free tier isn't unlimited. A few things to plan around:
Session length: free sessions typically max out around 12 hours, and Colab will disconnect you well before that if the tab sits idle.
GPU type: you'll generally be assigned a T4 GPU on the free tier — solid, but not the fastest option available.
Long videos: if you're processing something lengthy, split it into smaller segments rather than running one multi-hour job that risks a disconnect partway through.
Common Colab Errors and How to Fix Them
"Out of memory" / OOM errors
This usually means the video resolution or the batch size is too much for the GPU you were assigned. Try a lower upscale factor (2× instead of 4×), or process a shorter segment of the video at a time.
Google Drive won't mount
Re-run the mount cell and make sure you're approving access with the correct Google account. If it still won't connect, restart the Colab runtime (Runtime → Restart runtime) and mount again before touching the other cells.
Runtime disconnected mid-process
As long as you'd already mounted Drive before starting the enhancement cell, your progress up to the disconnect should be safe. Re-run the final cell — Video2X doesn't lose your source file, just the in-progress run.
Colab won't give you a GPU
Free-tier GPU access fluctuates with demand. If you're consistently getting bumped to CPU-only, try again later or during off-peak hours.
Pro Tips to Save Time
Shorter clips process faster — trim before you upload if you can
Stick to 2× scale instead of 4× unless you specifically need the extra resolution; it's meaningfully faster
If a long video is going to push past Colab's session limits, break it into parts and process each one separately
If a cell fails partway through, don't restart everything — just rerun that cell, your Drive files are untouched
Final Thoughts
Video2X on Google Colab is about as close as you'll get to a free, no-hardware answer to AI video upscaling. Four cells, a Google account, and a source clip is all it takes — Google's GPU does the actual work.
[Try it now: Open the Free Video2X Colab Notebook →]
Frequently Asked Questions
1. Is Video2X completely free to use on Google Colab?
Yes — Video2X is open-source and Colab provides the GPU for free, so there's no cost to run this workflow start to finish.
2. Do I need a powerful PC to run Video2X?
No. All the AI processing happens on Google's cloud GPU through Colab, so even a basic laptop can run this smoothly.
3. How long does it take to upscale a video using Video2X?
It depends on length and resolution: short clips under 30 seconds take 2–3 minutes, 720p footage takes around 10 minutes, and 1080p or 4K video can take 30–60+ minutes.
4. Where can I find the enhanced video after processing?
It saves automatically to your Google Drive, typically at /MyDrive/Video2X/outputs/.
5. Can I upscale any type of video?
Most common formats work, including MP4, MKV, and AVI. MP4 tends to give the smoothest results.
6. What AI model does Video2X use for enhancement?
Real-ESRGAN for live-action footage, or Waifu2x/Anime4K if you're working with anime or 2D animation.
7. Can I lose my video if the Colab session disconnects?
Not if you've mounted Google Drive before running the enhancement cell — your output stays saved there even through a disconnect.
8. Is the output better than traditional video editing tools?
In most cases, yes — the AI model recovers texture and detail that standard upscaling filters typically can't, especially on anime, old footage, and low-res clips.
9. Can I use this for YouTube or social media videos?
Yes, it's a common use case for sharpening footage before posting reels, shorts, or YouTube uploads.
10. What should I do if Colab shows an error or crashes?
Rerun the cell that failed and confirm your Drive is still mounted. A runtime restart usually doesn't cost you any saved output.